
Have you renewed your subscription for this school year? Renew your Agriculture or CTE libraries, and place your orders here.At the start of a school year, it is important for you to be prepared. In order to feel most prepared using MYcaert.com, we are sharing some recommended practices to ensure a smooth transition into the school year. 1) Create courses 2) Adding students 3) Assigning materials 1) Create Courses If you are new to MYcaert.com, and are unfamiliar with the various ways of creating courses, review this previous blog on Creating Course Outlines. Perhaps you would like to reuse course outlines from last year, you will simply "Make a Copy of Course Outline".  Follow these simple steps: Under My Courses, select the course outline you wish to duplicate. Upon the course outline page, select the “Make a Copy of this Course Outline”. Upon the next screen you will rename the course outline for the second semester. In this example, I used “2nd Sem 16-17” after the original course name. You can now make changes to this course outline. You can delete the lessons you’ve already taught, along the right edge of the course outline. You can also reorder the lessons by selecting “Reorder Lessons in Custom Outline”. On this screen you can move the lessons by clicking and holding on the lesson you want to move, and dragging it to the slot desired. At the bottom of the screen, you must select “Submit” for the changes to take place. 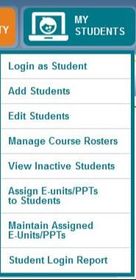 2) Adding Students Once you have created all your courses, you can add students. We just made a major adjustments to the "Add Students" page that will help Google Education Schools. Review the single sign-on for Google users here. Simply add new students underneath the "My Students" tab. You may add up to 15 at one time. "Manage course rosters" underneath "My Students" to review all your students are in the correct courses. 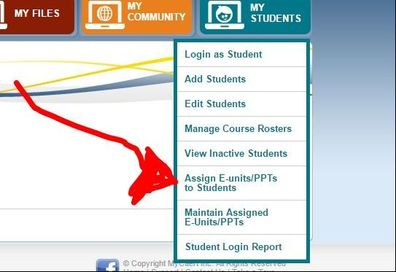 3) Assigning Work
Review the User’s Guide, pages 18-19. - Assign/ Maintain E-Units and PowerPoints It all starts with a course outline. You will need to build one in order to assign E-units and PowerPoints. For additional help, you can see a short video tutorial here. You can also add customized dates and assignments to student calendars. For example, you may have assigned a project for students in a specific course. The calendar will allow you to add important deadlines, and important documents for the student(s) to view, in the Custom Calendar. This option is also found underneath "Assign E-units/PPTs to Students".
0 Comments
Would you rather watch a 2 minute tutorial? Download the file below to access a Windows Media file.
 Previously, we created Course Outlines. Now, let's add new lessons to existing course outlines in MYcaert.com. At times, you may discover you wish to add lessons to your existing course outlines. Simply log in and select the lesson plan library needed. Once highlighted, click the floating submit button. 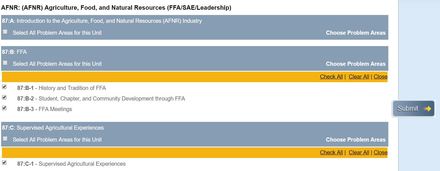 Next, select the units desired. Click submit. 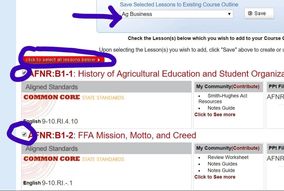 Finally, select the lesson plan titles you wish to add to your existing course outline, by checking the red boxes next to the titles. At the top of the screen click "Select All Lessons Below", if necessary. Select the Existing Course Outline from the second selection box, and click "Save". 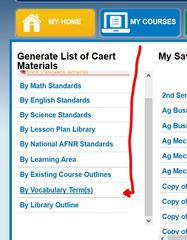 Additionally, you may wish to search for specific lesson plans. First, hover over My Courses, and select "Generate List of Caert Materials--> By Vocabulary Term(s)". Next, search by a specific term for the lessons you need. For example, “communications" was used to add to an Ag Business Course Outline. 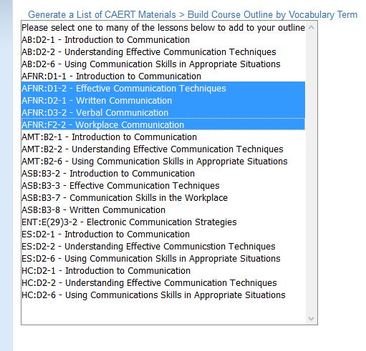 A list of materials matching the term(s) used is generated. Select the lesson(s) you desire to add by holding "CTRL" and clicking more than one lesson title. Click “Submit Query” in the right corner of the screen. Next, select the lessons desired by checking the box next to each red title. Then Select "Save to Existing Course Outline" and find the course outline you desire. Finalize by clicking “Save.” 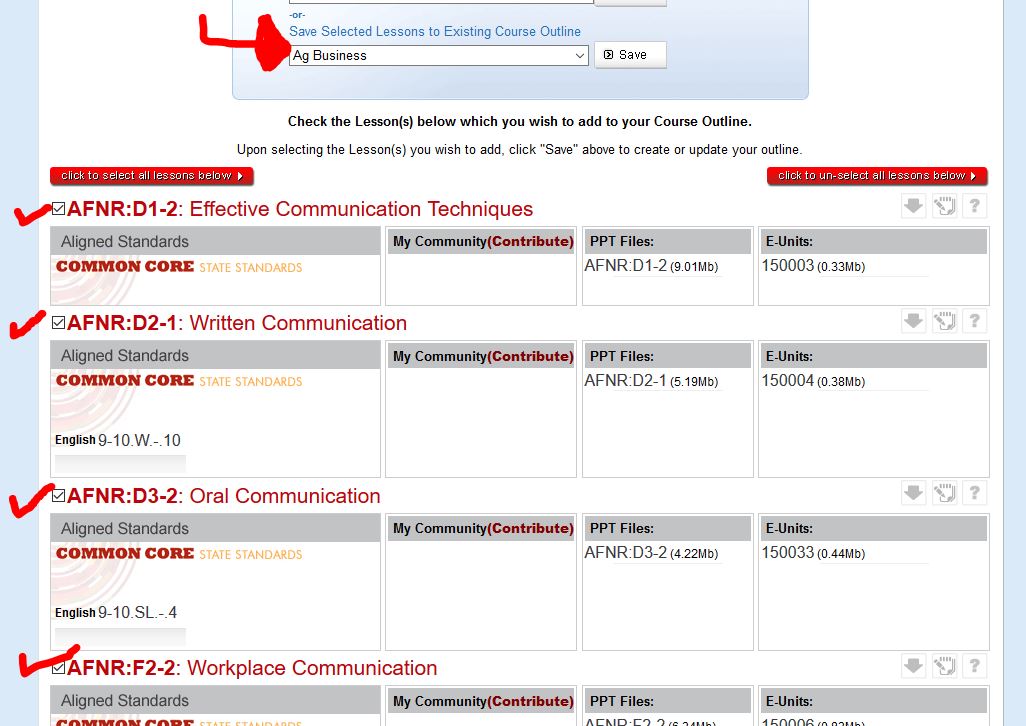 Would you rather watch a 3 minute tutorial instead? See our Windows Movie Video at the end of this blog entry. 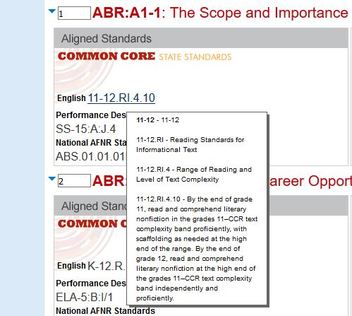 After you’ve created a course, you may want to view the standards aligned to the lessons in the course. This is a simple task. The standards are viewed in four simple ways.


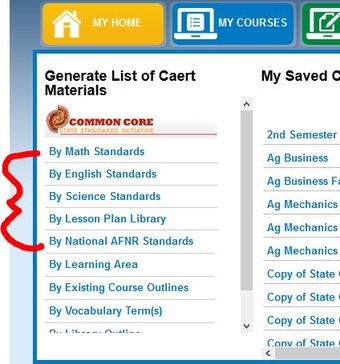 If you are searching for lessons aligned to specific standards, you can do so by hovering over “My Courses” and selecting the area of study desired (IE: National AFNR, National Math, National Science, National English, or State Standards). By following the prompts, you will find the lessons aligned to those standards.
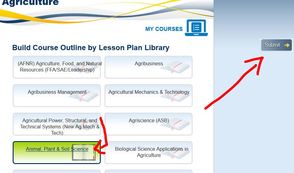
In a previous blog post, we asked you to tell us what you would like to see in upcoming blogs. One request was “Best Practices” within MYcaert.com. Recently, we’ve received a few requests on how to create a course. This blog will focus on the best practice of creating a course, and example courses. 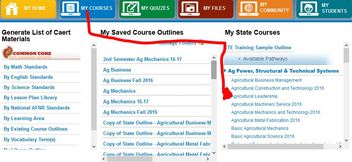 Upon logging into MYcaert, you will land on a screen with each subscribed library shown. From this screen you have several options to create a course. A very simple option, is to create a course from a sample course outline. By hovering over My Courses, you will find several Sample Course Outlines to the right. You can select one of those course outlines, and select “Make a copy and save it to my courses”. You can rename the course, reorder the lessons, and remove lessons, or add additional lessons to the outline.  Another way to create a course, from home screen, is selecting a library. For example, select Animal, Plant, and Soil Science. The following screen allows you to select the desired problem areas, taking you to the final screen to show you your lesson plan choices. Select the lessons you wish to save to your course outline, and create your custom course outline. 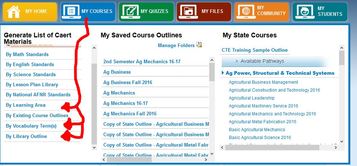 You can also create a course outline by vocabulary term, academic standard, or library outline. By using the Library Outline feature, you can use more than one library to create a course. This allows you to add in FFA and Communication lessons to any standard agriculture class.
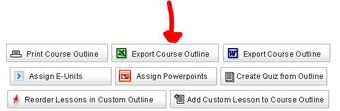
In MYcaert.com you are not limited to what lessons you can put into an outline. A recommended number is 60-65 lessons for a school year. Check out our brief video tutorial, showing you how to create a course outline! Examples Courses: Non- Ag CTE Courses Business and Technology Concepts Business Marketing and Computer Education Computer Concepts and Software Applications Care & Learning Services Occupations SCCO Child Development and Parenting SCCO Culinary Occupations I SCCO Nutrition and Culinary Arts I SCCO Nutrition and Wellness Occupations SSCO Culinary Occupations II SSCO FCS Communications Health Science Technology Drafting and Design Green Construction Manufacturing and Production Technology & Engineering Education AGRICULTURE Courses Agricultural Biotechnology Agricultural Business Management Agricultural Communications Agricultural Construction and Technology Agricultural Leadership Agricultural Machinery Service Agricultural Mechanics and Technology Agronomy Agricultural Metal Fabrication Agricultural Sales and Marketing Animal Science Aquacultural Science and Technology Basic Agricultural Mechanics Basic Agricultural Science Biological Science Applications in Agriculture- Animal Science Biological Science Applications in Agriculture-Plant Science Environmental Science Food Science Technology Greenhouse Production and Floral Design Horticultural Production and Management Introduction to the Agricultural Industry Landscaping and Turf Management Natural Resources Management and Conservation Physical Science Applications in Agriculture Veterinary Technology  With end of the semester exams around the corner, your mind is probably split between two places: creating semester exams, and preparation for 2nd semester. The past few blogs we have highlighted different ways you can re-use your quizzes- specifically, creating a quiz from existing quizzes. This feature is particularly useful for semester exams, choosing questions to compile from all the different quizzes you’ve previously assigned. You can also create a review quiz, with multiple chances for your students to view and submit. If you have already created your semester exams, you are likely preparing for second semester. As the first semester progressed you likely found that lessons may have taken longer, or took less time, depending on the topic and knowledge base of your students. In either case, you may need to reevaluate your course outlines for the second semester. To change a course outline for second semester, hover over My Courses and select the course outline you wish to change. Upon the course outline page, select the “Make a Copy of this Course Outline”.  Upon the next screen you will rename the course outline for the second semester. In this example, I used “2nd Sem 16-17” after the original course name. You can now make changes to this course outline, without losing what you planned at the beginning of the year. You can delete the lessons you’ve already taught, along the right edge of the course outline. You can also reorder the lessons by selecting “Reorder Lessons in Custom Outline”. On this screen you can move the lessons by clicking and holding on the lesson you want to move, and dragging it to the slot desired. At the bottom of the screen, you must select “Submit” for the changes to take place.  Want to see a quick video tutorial on this topic instead? Give yourself 3 minutes to watch this video!
|
AuthorsDan Pentony Archives
October 2017
Categories
All
|
||||||

 RSS Feed
